Everything I know about Arc Raiders all in one place.
All of my knowledge thus far has come from solo play so these tips and builds might be less relevant for squad play.
All of the information here is up to date as of November 3rd, 2025 and correct, to the best of my ability.
Fuck LLMs.
Thoughts/Comments/Corrections? Propose additions and edits here or send me a message.
Resources 
- Min Max Lab: short videos showing the mathematics of Arc Raiders gained through looking at the numbers and experimentation in-game.
Key Skills 
WIP UNDER CONSTRUCTION
TLDR: Focus on speed over all else. You can’t go wrong with faster looting, breaching and more stamina for running around the map. But, not all skills are created equally, some, mentioned below, seem to provide little to no real benefit despite claiming to. Until we can datamine the game or the devs prominently display the real data for these skills somewhere, we’ll have to really on trial and error and generous souls bricking their skill trees for science.
- Make sure you get the Field Crafting skill to allow you to craft items during a raid.
- Avoid putting more than a single point into the following skills: Slip and Slide, Sturdy Ankles, Effortless Roll, Calming Stroll. They really don’t seem to do anything.
Tips 
- Two Weapons are Better than One
- The early weapons tend to be very strong at specific ranges against specific targets but much weaker in other situations. Bringing two different weapons on a raid can be a cheap and effective way of dealing with your weapons’s weaknesses. Also, switching to a secondary weapon is usually quicker than reloading which could be the difference between winning a PvP encounter or losing it. A cheap but effective build for early play is the bolt-action Ferro, used for drones and mid-long range PvP fights, paired with the fast-firing Stitcher, used close range PvP fights.
- Got To Go Fast
- Adrenaline shots are surprisingly cheap to make. Bring them with you on every run, using them to run ASAP to high value loot areas as you load into a raid, looting these areas in peace and then extract before anyone even noticed you. If you’ve spawned late or are getting shot at from somewhere, adrenaline shots can also be used to escape from threats. Remember to holster your weapons to run even faster!
- Ape Together Strong
- When solo-queue-ing, every other raider you encounter on the map is going to be alone. If you can group up with the first other raider you meet (asking them through emotes AND VOIP from behind cover ideally), you’ve just doubled your ability to defend yourself from enemy raiders on this raid. Also, trusting a stranger and providing in-raid mutual aid can feel really good.
- Free Loadouts, Free Stress
- Free Loadouts can be a great choice if you’re looking to have a low intensity match with lower stakes or just looking to build up your inventory without any risk. But, keep in mind that Free Loadouts have less inventory slots, including no safe pocket slot, and so if you do find any high value loot during your raid, you’re going to be sweating trying to get it back to your base safely.
- Free Loadouts, Free Death
- Free Loadouts have their perks (they’re free), but going into a raid with one, potentially mediocre, weapon and few useful utility items means that you can easily find yourself at the mercy of better equipped raiders. Hopefully, they’re friendly or you’re ratty enough to get the drop on them at an appropriate range for the weapon you have.
- Negate All Fall Damage
- There are many ways of negating fall damage when falling (or jumping off) a cliff or building, here are a few: grabbing on to a ledge before you hit the ground (hold the jump button while you fall), grabbing on to a zip line as you fall or crouching/dodging just before you hit the ground (although this only works from about 2-3 floors up).
- Listen! Use your Ears
- Gunfire, breaching noise, emotes, proximity chat audio and ARC probes can be heard from surprisingly far away and can often be used to accurately pinpoint where the sources of these sounds are coming. To a lesser degree, looting sounds, footsteps and ARC thruster sounds can also be heard if you’re not making too much noise yourself. Use these sounds to navigate through the map safely.
- Dodge Rolls, Never Forget
- The Dodge Roll drastically reduces the size of your hitbox and moves your head’s hitbox around quickly making it harder for enemy raiders to hit. Due to almost universally low ammo counts on weapons, a well-timed dodge can be the difference between dying and living long enough to return fire and take out whoever is shooting at you. Dodging into cover is ideal but dodge rolling in the open can be just as effective especially if you dodge towards some nearby cover. But, beware that dodging requires stamina!
- One Man’s Baron Husk, Another Man’s Treasure
- Baron Husks are massive dead drones that you find on some maps. If you can hear them emitting a sound, that means that they haven’t been looted yet. If there’s no one around or you’ve got somebody spotting for you, climb on to the Husk, breach it, once it’s open, jump on to one of its legs to avoid the flame venting process then you can go back to the top of the Husk and loot it. This venting process is very loud and visible on the map so be prepared to encounter raiders soon after.
- Always Be Probing
- Probes that you can see landing on the planet are filled with loot (they’re about twice as tall as a raider and emit a sort-of “radar pinging” sound that can be heard from quite far away). Probes are likely to give you high value loot that you can sell or use to build Medium Shields, among other things. Beware that breaching them may cause other ARCs nearby to show up, but you can throw a smoke grenade at it before you start breaching to prevent it from calling any reinforcements. Raider caches work similarly but are placed on the map initially, they also emit a sort of pinging sound.
- Fresh or Stale Spawn, Know the Difference
- When you load into a raid look at the timer in the middle of the screen. If it’s around 30min that means you’ve loaded into a fresh map, where nothing has been looted yet and everyone else on the map has also just spawned. If the time shown is significantly lower, that means that other raiders have already loaded into the map and have been looting. If so, beware that other raiders may be closer to you on the map than you would expect.
- Think Twice, About Repairing instead of Crafting
- Some broken items (items with a durability of 0.0) are more costly to fully repair compared to recycling them and crafting them from scratch. The most egregious example of this that I’ve found so far is the Medium Shield which requires 1x ARC Circuitry and 4x Battery to craft, it requires 2x ARC Circuitry and 2x Battery to fully repair (from 0.0 to 100.0) and it grants 1x ARC Circuitry when recycled (insert Pepe Silvia meme)… TLDR: repairing these items only makes sense if you can’t craft them yet (crafting a Medium Shield requires Gear Bench II), but even then unless your squad bullies you into it, early on I wouldn’t waste precious resources before your inventory is fat with loot (but, if that’s the case you’re likely to have access to Gear Bench II).
- Shoot your Friends (in the elevator) for Profit
- Shooting raiders gives you XP so even if you’ve found some friendly raiders to extract with you should shoot at them once the extraction exit has been activated as much as you can because that will give you XP at no cost to anyone (other than the ammo expenditure). If you can warn them about this ahead of time, they might appreciate that!
- A Farro a Day, Takes Their (light) Shield Away
- Landing a single Farro shot on a raider (which deals 40 damage before damage reduction) will blow up their shield immediately (playing a noticeable visual and sound effect) if they’re equipped with a Light Shield (which can take up to 40 damage before blowing up), otherwise, the shield won’t blow up and then you’ll know that the raider is equipped with a heavier shield. Either way, you’ll now approximately know how many more bullets you’ll need to dump into them before they go down. Technically you can look at a raider’s back to see which shield they’re equipped with but that’s not feasible in most circumstances.
- (In)doors, Weapons Out
- Fireballs and Pops ARC can be found in surprising numbers inside buildings. These ARC will hunt you down and they can travel through zipline shafts, so always keep a weapon out, keep your ears and eyes open and be ready to fire on any ARC (or any raiders that) run up to you.
Tier Lists 
Early Weapon Tier List 
All the weapons below can be crafted relatively cheaply from the Workbench, except for the Rattler which can be crafted using the Gunsmith I.
| Tier | Name | Pros | Cons | |
|---|---|---|---|---|
| S | 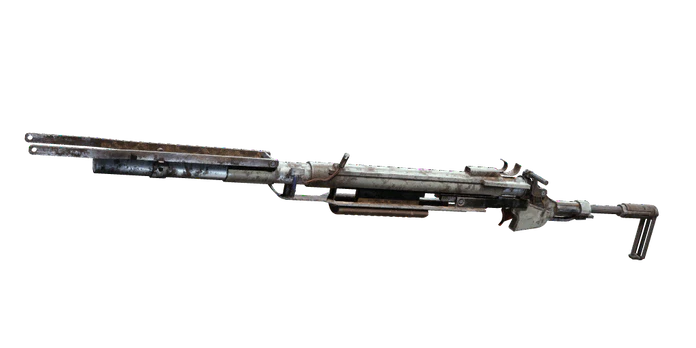 | Ferro | Effective at medium to long range against raiders (especially when they’re looting containers so you can headshot them) and at taking out ARC. Extremely cheap to craft. | Bolt-Action. Slow reloads at level 1. Weak against other raiders, especially at close range, if this is the only weapon you have. |
| S | 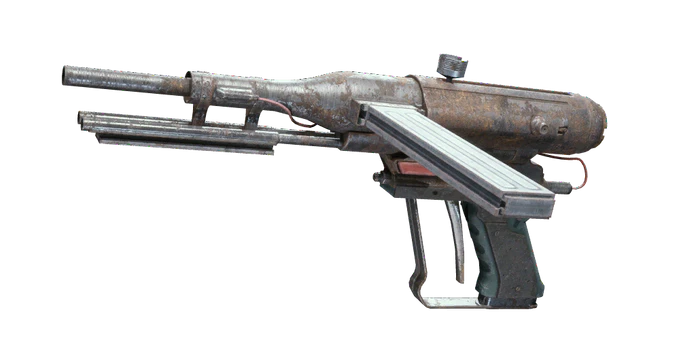 | Stitcher | High DPS. Effective at short range against raiders and lightly armored ARC. Can be modded with a cheap extended mag, adding 5 bullets to the base of 20. | Really High Recoil at level 1 (but cheap to upgrade). |
| A | 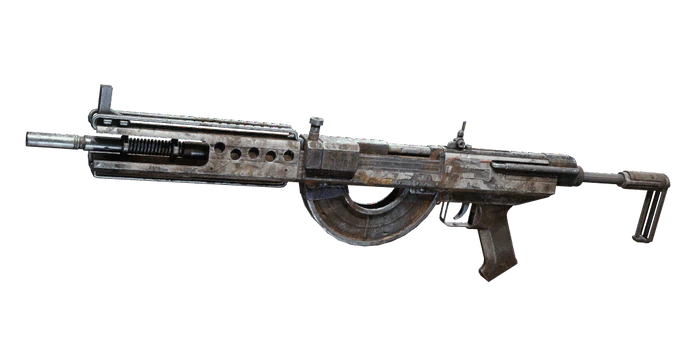 | Rattler | Jack of All Trades. Effective at medium range against everything, especially when upgraded. Upgrades increase ammo count. | Extremely slow reloads. Low ammo count at level 1. Expensive to craft and upgrade (~2-3x the cost of the Stitcher). |
| C | 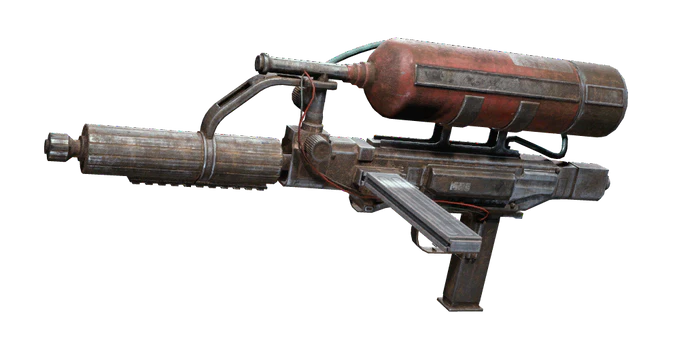 | Kettle | High ammo count. | Semi-Automatic. Low bullet velocity. Slow reloads. |
| F | 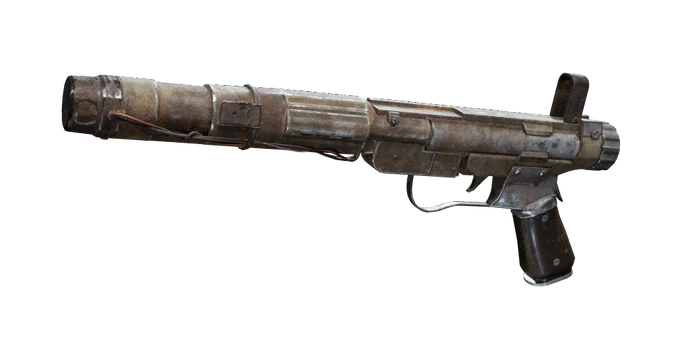 | Hairpin | Tickles raiders and ARC alike. Waste of an inventory slot and crafting materials. Louder than you would expect but I’ve never heard anyone else fire a Hairpin so I don’t know. |
TLDR:
- Running a Ferro and a Stitcher (ideally with a cheap extended mag mod) is extremely cheap and effective.
- With good aim at short or medium range, you can take a fully healed and decked out raider in the following way:
- Shoot them with the Ferro once (ideally getting a headshot if you can)
- Sprint at them while switching to the Stitcher
- Spray at them with the Stitcher (watch out for the crazy recoil) before they can heal themselves.
- It’s effective enough that you can easily be hit by a few shots while emoting (“don’t shoot”) at a raider and still win the subsequent fight against them if they’re equipped poorly.
- At very close range, stick to the Stitcher because missing with your initial Ferro shot is devestating.
- If you’re willing to pay the price and willing to lose some effectiveness at very close range against raiders (in exchange for ), then replacing the Stitcher with a Rattler might be viable.
The Two Rattler Build 
Pros:
- Jack of All Trades. The Rattler is great against ARC AND Raiders when upgraded. Even a single one can get a lot done but when you run out of ammo, especially against other raiders, you’ll be wishing you had a side arm.
- Surprise Factor. For example, if someone hears you shooting with a Rattler and ambushes you while you’re fighting ARC, they won’t expect you to have another fully reloaded Rattler ready to switch to and blast them away with.
- Extremely effective against ARC. If you’re looking to take down ARC for their materials, Trials or Feats, the Rattler provides a good balance of cost to benefit at the expense of worst outcomes against raiders at very close range.
Cons:
- Expensive. Crafting and Upgrading the Rattler costs a lot. So upgrading two of them costs twice as much.
- Not as effective at very close range against raiders compared to the Stitcher.
The two Rattler build provides you with more sustained DPS over longer periods of time than the other cheaper alternatives which tend to be more bursty.
The two Rattler build is effective against hordes of light ARC, bigger ARC and other raiders (potentially even when outnumbered) due to its great ARC armor penetration and sustained DPS allowing you to fire for longer periods of time at more targets than the alternatives.
You have to ask yourself whether you’re willing to either pay the cost reducing your effectiveness at close range against raiders who might be able to take you out before you can even whip out your second Rattler.
Mid Weapon Tier List 
Until you find some weapon blueprints (which seem to be a very rare loot drop), the weapons above will be the ones you have easy access to. Once you begin upgrading your Gunsmith, you’ll get access to the Arpeggio (assault rifle) and the Renegade (battle rifle).
Early testing with the Arpeggio assault rifle (which can be crafted from the Gunsmith II) is promising but more testing needs to be done to see if it’s worth crafting.
Early testing with the IL TORO shotgun (which can be purchased from the Gun Shop) is promising but more testing need to be done to see if it’s worth buying.
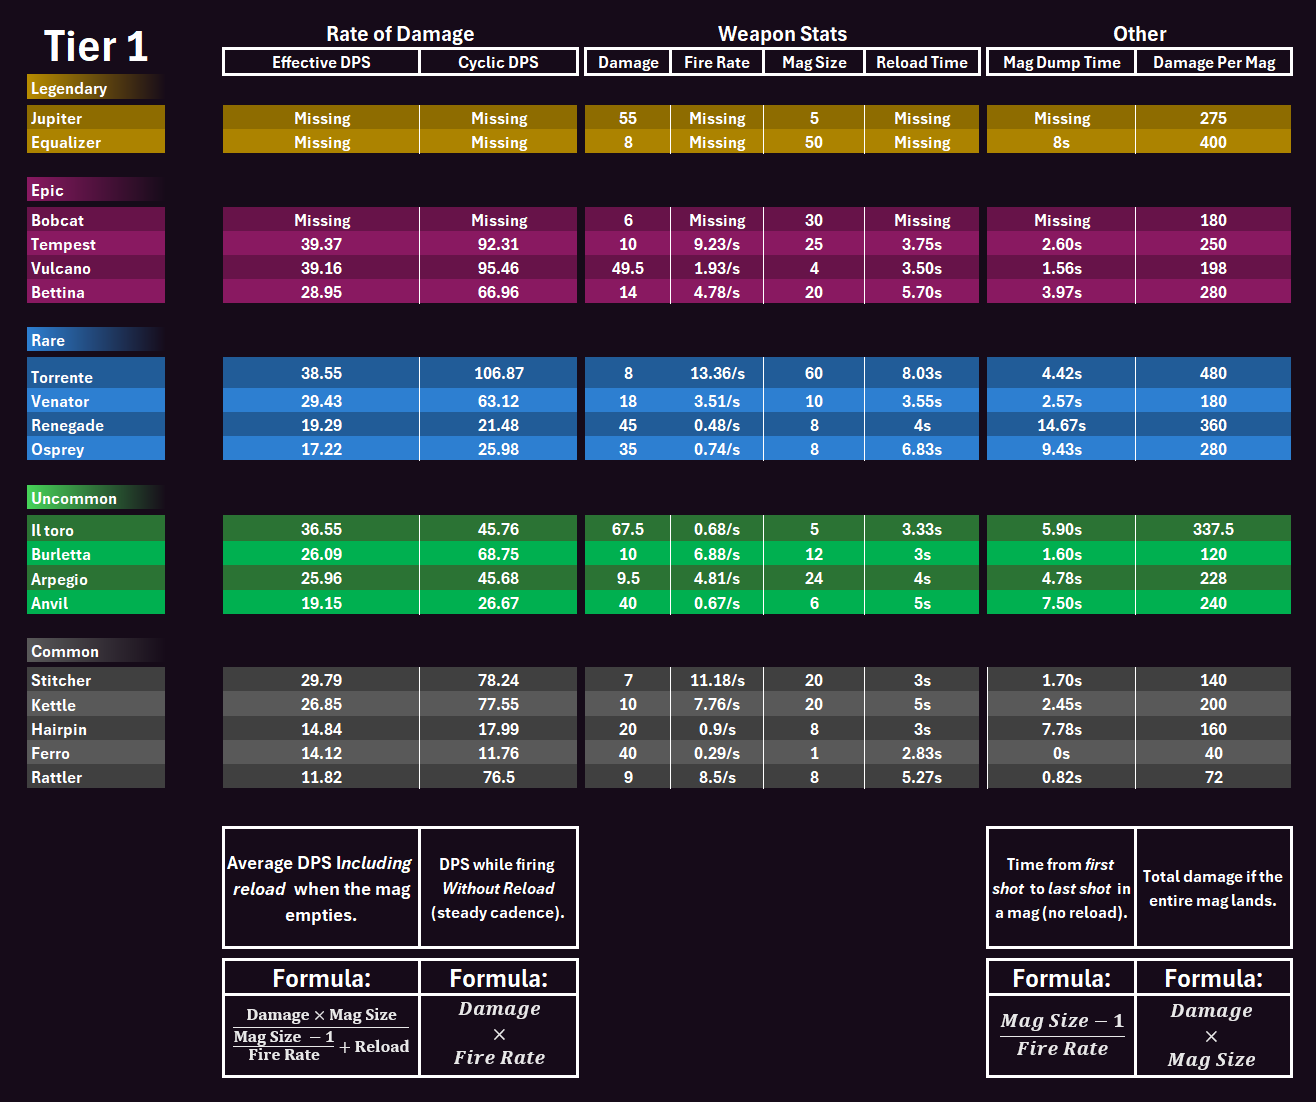
Tier 1 Weapon Stats 
Source: from Discord user @theendofnether
Item Tier List 
- Better bandages are essential, especially in PvP. Make as many as you can and focus on the Medical Bench upgrades and having crafting materials available to make them.
- Jolt Mine SSS for solo play.
- Wolfpack SSS. Rare but can take out ARC quickly allowing you to loot them for their valuable loot.
- Adrenaline Shot SS. Getting to places first to loot them safely is key. After a certain number of minutes have elapsed the likelihood of someone hiding in a corner of a building increases astronomically. It’s best to avoid that. The earlier you exit the less likely that your exit will be contested.
- Lure Grenade S. Essential for getting ARC away from you so that you can remain in stealth, for luring ARC toward other raiders to discourage them from facing you (especially in squad play), also using a big ARC to take out another big ARC with the Lure Grenade can be fun (TBD).
ARC 
Crouching and moving slowly does wonders for avoiding ARC. Not firing loud weapons near them also helps a bunch.
If you can’t avoid doing both of these things near ARC, then be prepared for a fight with them and for any nearby ARC to show up.
ARC are universally weak to the electrical stuns provided by a few items (Showstopper(s), Hornet Driver(s), Jolt Mine(s)). Any ARC hit by a stun will be rendered immobile and unable to attack for 10 seconds allowing you to escape or to target their weakpoints more easily (or if you’re like me, land your grenades on them).
Pop 
The Pop is a small ball-shaped grounded ARC that rolls around.
- Unarmored.
- A smaller target than the Fireball.
- Often found in buildings.
Weakpoints:
- None. But its unarmored.
Fireball 
The Fireball is a medium-sized ball-shaped grounded ARC that rolls around.
- Armored.
- Attacks with high damage flames at close range.
- Do not be caught offguard by this a Fireball. It’ll hurt.
- Often found in buildings.
Weakpoints:
- Inner Core. Revealed (usually) when it sees a raider. It’ll stop moving for a second before starting to spew flames.
Surveyor 
The Surveyor is a large ball-shaped grounded ARC that rolls around continuously and periodically stops, revealing its weak antenna, beaming a cylindrical-shaped blue light into the sky.
- Armored.
- No attacks, only flees.
- Found outside.
Weakpoints:
- Antenna. Revealed when it’s stopped.
Snitch 
The Snitch is a flying ARC that floats high in the sky and calls in ARC reinforcements from space if it detects any raiders in its vicinity.
- Not to be confused with the Stitch (the weapon).
Weakpoints:
- 3x Side Flaps. Take one out then hit the vulnerable core to out a Snitch.
Wasp 
The Wasp is a flying ARC with four unarmored thrusters.
- Fires bursts of shots at close to medium range.
Weakpoints:
- Unarmored thrusters. Take two out and the Wasp will crash to the ground.
Hornet 
The Hornet is a flying ARC with two armored front thrusters and two unarmored back thrusters.
- Fires single taser-like shots at close to medium range. A “charging up” sound can be heard before it fires.
Weakpoints:
- Unarmored back thrusters. Take two thrusters out and the Hornet will crash to the ground.
- Armored front thrusters. Less of a weakpoint than the unarmored back thrusters but sometimes they’ll have to do.
Rocketteer 
The Rocketteer is a flying ARC that rains rockets down on any raiders it detects.
- The rockets are quick and are very hard to avoid.
- Once a Rocketteer started shooting rockets the ensuing noise is likely to bring in any nearby ARC to investigate.
- Can be taken out by a single Wolfpack grenade.
Weakpoints:
- Armored thrusters. Take two out and the Rocketteer will crash to the ground.
Bombadier 
TBD confirm that I’m not confusing two different ARC.
The Bombadier is a grounded ARC that is accompanied by two flying Spotter ARC at a time (they look like miniature Snitch(es)) that it uses to acquire targets. The Bombadier fires homing missiles at any targets its Spotters acquire for it.
- Bombadier fire makes a ton of noise which bring in any curious raiders.
- Get into cover ASAP to avoid getting hit by Bombadier fire.
Weakpoints:
- None. Although taking out its Spotters from cover will prevent it from firing at you.
Bastion 
WIP
The Bastion is a grounded ARC that lays down heavy fire at anyone it sees.
- The Bastion is loud!
Weakpoints:
- None?
Leaper 
The Leaper is a grounded ARC that walks around on four legs and leaps at any raiders it sees.
- Avoid fighting Leapers out in the open. Even with a few Adrenaline Shot(s), you won’t be able to outrun one unless you can get into a building ASAP.
- If you need to fight a Leaper then do so from inside of buildings.
- Can almost be taken out by a single Wolfpack grenade. You’ll need to take a few more shots at it to take it out.
Weakpoints:
- Armored leg joints.
- Armored core.
Augments 
The kind of augment you choose to use will depend on which Mk. of augments you have access to
Mk. 1 
Mk. 1 augments don’t have special abilities like the later Mk.(s) do so the main difference between each of them is the number of inventory slots they grant you and their Max Inventory Weight stat which determines how much heavy loot you can carry.
Presumably, if you’re using Mk. 1 augments you’re poor and so looting and extracting succefully will be your first priority.
In that case, your choice of Mk. 1 augment will depend on what level of shield you have access to.
If you only have access to Light Shield(s), then you’ll want to use the Looting Augment Mk. 1 which is only compatible with the Light Shield but grants you the maximum number of inventory slots and Max Inventory Weight.
If you have access to Medium Shield(s), then you’ll want to use the Combat Augment Mk. 1 which will allow you to use it. You’ll be paying for a bit of extra survivability with a few less inventory slots but if the Medium Shield helps you survive a PvP fight it’ll pay for itself.
Mk. 2 
The Looting augment Mk 2.:
- Gives you 3 extra trinket slots (trinkets are items that can only be sold for money, or in some rare cases they can be used for upgrades).
- Gives +4 normal inventory slots compared to the other Mk 2. augments.
- Gives 2 safe pocket slots instead of 1.
- TBD WEIGHT
- Automatically throws ticks off of you (a useless ability).
- Is compatible with Light Shield(s).
The Combat Augment Mk 2.:
- Gives you an extra grenade slot which can only be used for grenades.
- TBD WEIGHT
- Grants you 1 HP regen every 5 seconds (a really weak ability).
- Is compatible with all shields.
The Tactical Augment Mk 2.
- Gives you an extra “Raider Tool” slot (for now, Ziplines, Mines, Grappling Hook, basically anything that isn’t a healing/shield item or a grenade seems to go into this slot).
- Gives +1 normal inventory slots compared to the other Mk 2. augments.
- TBD WEIGHT
- Automatically drops a small smoke grenade on you when the shield blows up (a really useful ability).
- Is compatible with Light Shield(s) and Medium Shield(s).
I’ve settled on using Tactical Augment Mk 2. with a Medium Shield for most raids due to the effectiveness of its ability. Use it for yourself and you’ll see how effective the smoke is at preventing you being killed instantly; the smoke can provide you with just a few moments of relative safety to get back into cover and escape or if the enemy raider chooses to push into the smoke then you might be able to take them down.
In the Raider Tool slot that the Tactical Augment Mk 2. provides, I’ve been bringing a Jolt Mine with me on most solo raids. They’re easy to hide behind doorways, allowing me to loot a building as much as I want without worrying about someone rushing at me while I’m looting. If someone does, they’ll get stunned for 4 seconds when the mine triggers, giving me more than enough time to stop looting and take them out before they can retaliate.
For loot-heavy raids (when I’m bringing a key especially) I might choose to bring a Looting Augment Mk 2. to maximize my profits due to many more inventory slots.
Mk. 3 
TBD
Builds 
Day One Budget Build 
- Roll the dice on a Free Loadout and extract successfully to gather materials you’ll need to make a “real” build.
But, the Free Loadout only:
- Equips you a single, potentially mediocre, weapon (god forbid you get the Kettle). Pray for a Stitcher and friendly raiders if you’re going in to a raid by yourself.
- Has a Max Loadout Weight of 35.0 and 14 inventory slots (35.0/14). This is quite low compared to the 50.0/18 provided by the Looting Augment Mk. 1 and the 45.0/16 provided by the Combat Augment Mk. 1. With a Free Loadout you’ll likely find yourself wishing you had a real Augment equipped after you loot two containers or a quarter of a Raider’s inventory.
Early Budget Build 
This build is cheap but effective, providing you with everything you need to take out raiders and low level ARC with ease no matter the situation you find yourself in.
- Looting Augment Mk. 1
- Light Shield
- 1x Stitcher I
- 1x Ferro I
- 3x bandages
- 1-2x shield rechargers
- 1x adrenaline shot
Mid Budget Build 
Similar to the early budget build but a little more expensive. It also requires a Gear Bench II to be sustainable (to be able to craft the Medium Shield).
Although the Medium Shield only provides 2.5% more damage reduction than the Light Shield, the Medium Shield can reduce about 2.5x (?) more damage overall before turning shutting off compared to the Light Shield. This can give you the edge you need to survive an initial salvo of fire taking out the hostile raider before your shield shuts off. It can also allow you to bandage up during a firefight and continue trading fire instead of being forced to both bandage up and recharge your shield.
- Combat Augment Mk. 1
- Medium Shield
- 1x Stitcher I-III with Light Extended Mag I
- 1x Ferro I
- No need to upgrade the Ferro, you’re never going to reload this weapon in combat unless you have to. You’d be better served by not returning fire at all and either getting closer to allow your Stitcher to come into play or run from the fight completely.
- 5x bandages
- 4-5x shield rechargers
- 3x adrenaline shots
Raid Modifiers 
Prospecting Probes 
During these raids, more probes will land on the surface. Probes are tall cylindral ARC with a blue light at the top which contain ARC loot but especially ARC Circuitry which are used in the fabrication of Medium Shield(s).
Bring smokes to cover you while you breach and loot these probes. Even the cheapest smoke can, if placed and timed right, prevent the probe from calling nearby ARC to attack you while you’re breaching it.
Night Raid 
Better loot but ratting is encouraged because looting makes sound but sitting in the dark doesn’t. Also, raider flares (big red flares that shoot up into the sky) don’t trigger when raiders die in buildings (where most ratting occurs) reducing the risk that a raider looting a raider they’ve killed might get jumped by a 3rd raider.
Night Raid is considered to be a “map condition” for the purposes of Trials, so performing Trials challenges in Night Raids provides you with 2x the number of points than you would normally get. This 2x point modifier is a prerequesite for 3 star-ing most of these Trials IMO.
At night, the white strobbing light at the top of Supply Beacons make them really visible, making Night Raids even more ideal than other map modifiers for calling in and getting to Supply Drops.
Launch Tower Loot (Spaceport only) 
WIP UNDER CONSTRUCTION
Electromagnetic Storm 
WIP UNDER CONSTRUCTION
Harvester 
WIP UNDER CONSTRUCTION
Randomizer 
WIP UNDER CONSTRUCTION